Friday, March 21, 2014

Eclipse + JavaServer Pages (JSP) beginner's tutorial

Eclipse is a widely used open-source integrated development environment (IDE).


Visit the Eclipse download page. Find the download for "Eclipse IDE for Java EE Developers". Select the appropriate version for your computer (it must match the JDK/JRE you have installed)!


Extract the archive's contents. There is no need to run any setup program.


Navigate to the newly extracted 'eclipse' folder and run 'eclipse.exe'.


The workspace directory is where Eclipse will store all your projects.


Let's make a new project! Click "File", then "New", then "Other..." (or press Ctrl+N).


If you don't see "Dynamic Web Project" the most common cause is because you did not download the "Java EE" edition of Eclipse.


Since this is the first JSP project, Eclipse doesn't know about the Tomcat installation. After configuring a "New Runtime" it should be available in the dropdown menu for future use.


Don't check "Create a new local server".


Remember where you installed Tomcat? Enter that path or browse to it.


Tomcat should now be an option :^)


A blank canvas awaits you...


Let's make our first JSP page. Right click on the 'WebContent' folder.


We want JSP - not HTML - since we are going to have some dynamically generated content. Although there is nothing wrong with using pure HTML files for static content.


Recall that files named 'index.*' will be the default "home page" served up by the webserver.


There are some predefined templates available. You don't have to use them, but they are convenient.


Enter the example code highlighted in yellow. What do you think it will do?


Click the green run button on the toolbar so we can find out.


Once you confirm your selection here, Eclipse shouldn't ask you again for this project.


Create a new Tomcat server on your localhost for development of this project.


Your project will be built and a Tomcat server will be started (see the "Servers" tab.)

Your default page will be loaded inside Eclipse's internal web browser!

If you see "4" (the result of "2+2") then you have successfully generated a dynamic page!


Browse to your local Tomcat instance in a "real" web browser.


View the source code of the page.


Check it out... you only see the result of the code executed between the start and end of the JSP tags. The actual source code is not revealed to the client.


Shut down your Tomcat server from within Eclipse by clicking the red stop button.


Further Reading


There are a number of JSP tutorials (of varying quality) freely available online.

Here's a decent one I stumbled across: http://www.jsptut.com/

I definitely suggest you read both tutorials and a JSP reference to understand the features, power, and flexibility of the language. Remember: it doesn't matter if you are outputting HTML, XML, JSON, whatever... it's all delivered over HTTP.

That's it! You're done

Friday, March 7, 2014

How To Install Tomcat 7.0.52 Server on CentOS & RedHat 5/6

Apache Tomcat is an opensource webserver product of Apache Foundation like Apache HTTP server. It is used to deploying Java Servlet and JSP applications. To deploy any application in Tomcat we can simply create a war file and deploy them. For more details about you can visit apache official site http://tomcat.apache.org/ .

tomcat-apache-software-foundation

This article will help you to install Apache Tomcat 7 on CentOS/RHEL servers. We are using CentOS 6.5 and installing Apache tomcat 7. To read more about this release read Tomcat Release Notes.
Step 1: Check JAVA

JAVA is the first requirement of tomcat installation. Use following command to check if you have java installed already on your system.
# java -version

If you do not have java installed, Use this guide to install Java.
Step 2: Download and Extract Tomcat Archive

Download Apache tomcat archive file from Apache tomcat official site using below download url
Download URL: http://tomcat.apache.org/download-70.cgi
# cd /opt
# wget http://www.eu.apache.org/dist/tomcat/tomcat-7/v7.0.52/bin/apache-tomcat-7.0.52.tar.gz

After competed download extract archive file in /opt directory. You may change this location as per your setup.
# tar xzf apache-tomcat-7.0.52.tar.gz

Step 3: Start Tomcat Service

Tomcat is very easy to use, There are no need to compile its source. You simple extract the archive and start the tomcat server. Tomcat by default start on port 8080, So make sure no other application using the same port.
# cd apache-tomcat-7.0.52
# ./bin/startup.sh

[Sample Output]
Using CATALINA_BASE:   /opt/apache-tomcat-7.0.52
Using CATALINA_HOME: /opt/apache-tomcat-7.0.52
Using CATALINA_TMPDIR: /opt/apache-tomcat-7.0.52/temp
Using JRE_HOME: /usr
Using CLASSPATH: /opt/apache-tomcat-7.0.52/bin/bootstrap.jar:/opt/apache-tomcat-7.0.52/bin/tomcat-juli.jar

Step 4: Access Tomcat in Browser

Tomcat server works on port 8080 default. Access tomcat on web browser by connecting your server on port 8080.
http://svr2.tecadmin.net:8080

apache-tomcat-setup
Step 5: Setup User Accounts

Finally we need to create user accounts to secure and access admin/manager pages. Edit conf/tomcat-users.xml file in your editor and paste inside <tomcat-users> </tomcat-users> tags.
# user manager can access only manager section.
<role rolename="manager-gui" />
<user username="manager" password="_SECRET_PASSWORD_" roles="manager-gui" />

# user admin can access manager and admin section both.
<role rolename="admin-gui" />
<user username="admin" password="_SECRET_PASSWORD_" roles="manager-gui,admin-gui" />

I hope above steps will help you to setup tomcat on your server.

Thanks

Sunday, January 19, 2014

How to Resize the Root Partition in Linux on Amazon EC2

Check the Root Partition size before resize:
df -h

1The current root partition size is ~8 GB.

After that, stop your instance:
sudo poweroff

2

Go to Volumes on the left-hand EC2 navigation control panel.Right-click on the volume you want to resize and select Create Snapshot.

3Note: Make sure you also check the availability zone.

Fill out the details of the snapshot you are creating.

4

Go to Snapshots on the left-hand EC2 navigation control panel.Right-click on the snapshot you created and select Create Volume from Snapshot.

5

Enter the new size of the partition that you would like to be, select the same availability zone in which your instance is running and click Yes,Create.

6

Go back to the Volumes in the EC2 control panel. Select the old root volume, right click on it and select Detach Volume.

7

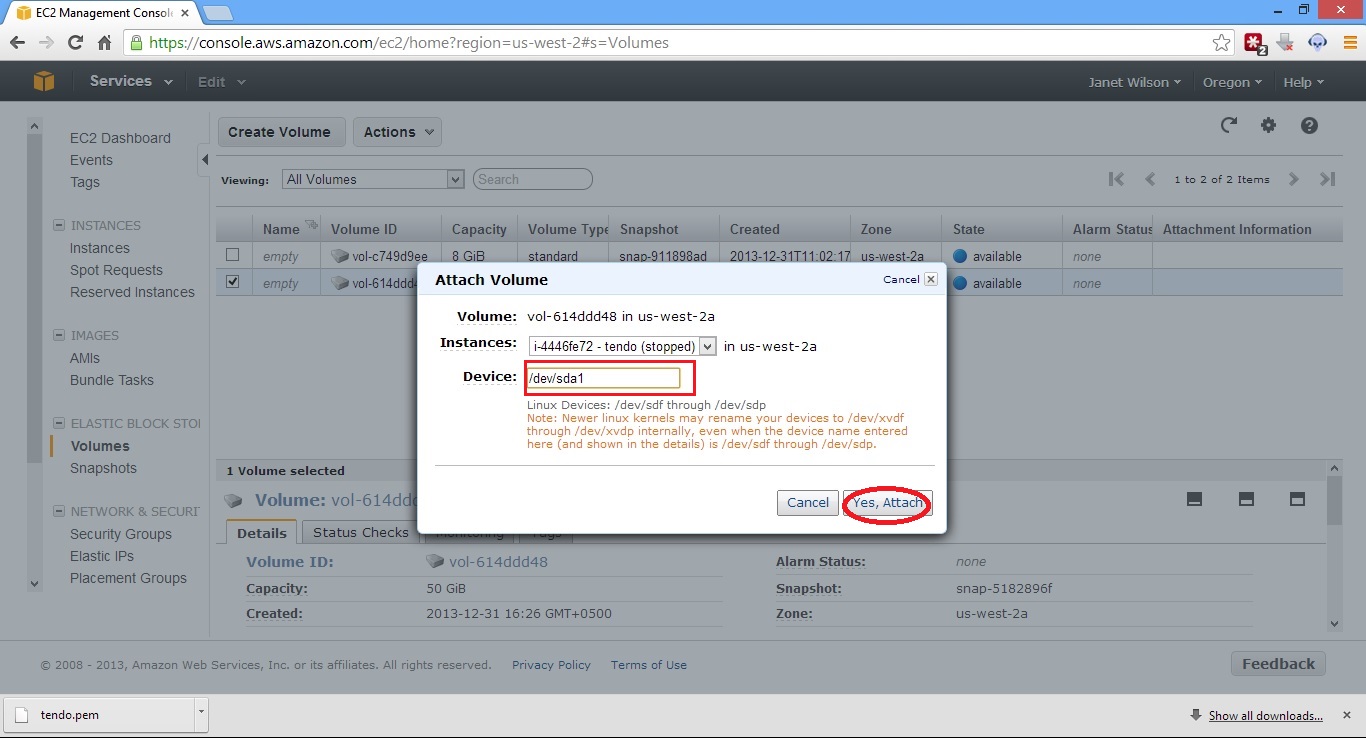
Now right click on the new volume that we have just created and select Attach Volume.

8

Please make sure that the volume should be attached as /dev/sda1:

9

Now turn on your instance. Make a note of your partition name, in my case it is /dev/xvda1. Type the resize2fs /dev/xvda1 command.
sudo resize2fs /dev/xvda1

10

After that view the new root partition size.
df -h

11

Yes, it’s work

Hope this will help you!

Please Remember me in your prayers!

InterVLAN Routing with Internet Access on Ubuntu

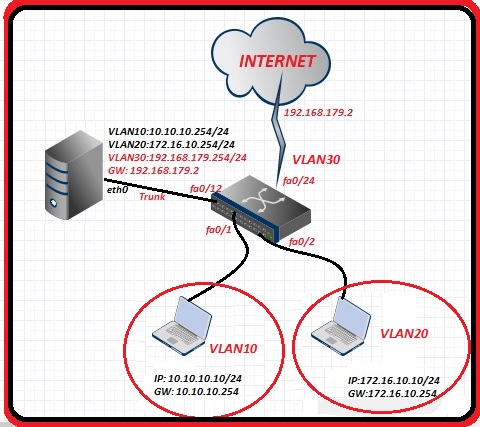
topology

Scenario:

  • Router: Ubuntu Server with 1 network card.

  • Clients:  WindowsXP in VLAN10,Windows7 in VLAN20.

  • Internet: Internet Router on VLAN30

  • Switch: Cisco 2960


Cisco 2960 Switch Configuration:

interface FastEthernet0/12
description CONNECTED TO UBUNTU ROUTER
switchport mode trunk
!
!
interface FastEthernet0/1
description WINXP
switchport access vlan 10
switchport mode access
!
!
interface FastEthernet0/2
description Win7
switchport access vlan 20
switchport mode access
!
!
interface FastEthernet0/24
description Internet Router
switchport access vlan 30
switchport mode access

Ubuntu Router Configuration:

To install the vlan support on ubuntu, use this command:
sudo apt-get install vlan

1

Now we shall configure the vlans on Ubuntu router by editing the /etc/network/interfaces:
sudo nano /etc/network/interfaces

1

2

To enable ip forwarding, edit /etc/sysctl.conf file:
sudo nano /etc/sysctl.conf

2

Change net.ipv4.ip_forward from 0 to 1:

3

Load “8021q” kernel module:
sudo modprobe 8021q

4

Restart the Networking service:
sudo /etc/init.d/networking restart

5

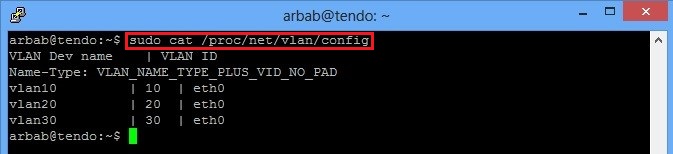
Verify the vlan configuration:
sudo cat /proc/net/vlan/config

6

In order to provide internet access to Vlan 10 and 20 client(s), we need to do NAT on Vlan 30 interface, on which we have configured the Gateway:
sudo iptables -t nat -A POSTROUTING -o vlan30 -j MASQUERADE

3

Verify the routing information on Ubuntu:
sudo route -n

4

Test from WinXP:

5

6

7

Test from Win7:

8

9

10

Hope this will help you!

Please Remember me in your prayers