In this tutorial, I’ll explain the step by step procedure to resize the Linux root partition without losing the date. This will be really handy if you are not using LVM and you came to know that your existing root partition is run out of space.
WARNING: It’s really dangerous, so backup your data before attempting this. Please don’t blame me, if you destroy your system. You are responsible for your own actions!
Prerequisites to Start this Tutorial:You will need to download the GParted live CD ISO file for the later use in this tutorial, so you can get this
here.
Let’s start the tutorial by verifying the current root filesystem size:
df -h

Create any file, just for verification, that we didn’t lose the data during the root partition increase process.
Turn off the virtual machine:
sudo shutdown -h now

Once, it shutdown, Click on the “Edit Machine Settings“, select the Hard Disk from the right side and press “Utilities“. A menu will be displayed, select “Expand” from it:

Current size is 4GB (It will be different in your case):

Increase it to your desired size(mine is 10 GB):

Once it will be expanded, will show you the success message:

Select the CD/DVD and press Browse:

Locate the GParted ISO that we have download in the prerequisite step:

Next, Power on the virtual machine to BIOS:
<

Select the CDROM as first boot device from Boot Menu:

Accept the Default Settings:

Select “Don’t touch keymap“:

Press
Enter to accept the default type of keyboard that have:

Press
Enter again to
start GParted in graphic mode:

Select the “
linux-swap” from the partition layout and press the “
Swapoff” from the Partition menu:

Select the “
exteneded” from the partition layout and press the “
Resize/Move“from the Partition menu:

Assign all unallocated space to it:

Press the “
Resize/Move” Button after assigning all the unallocated space:

Next, again select the “
linux-swap” from the partition layout and press the ”
Resize/Move” Button:

Move the swap to the end of the extended partition and press the ”
Resize/Move” Button:

Click “
OK“ to the warning:

Once again select the “
exteneded“ from the partition layout and press the “
Resize/Move” button:

Shrink it like this, so that it’s size will only be equal to the size of the swap partition by moving the slider from left to the right side and press the “
Resize/Move” button:

Next, select the “
/dev/sda1“,which is root filesystem, from the partition layout and press the ”
Resize/Move” Button:

Assign all unallocated space to it:

Then press the ”
Resize/Move” Button:

Once you are done with the changes and sure that they are correct, press the “
Apply” Button (
Be Careful: changes will be irreversible once applied):

If everything go well, GParted will show us the “All operations successfully completed”, just press
Close:

Reboot the system, login to the machine and verify the increase in the size of the partition of root filesystem:
df -h

Enjoy

Hope this will help you!
 The current root partition size is ~8 GB.
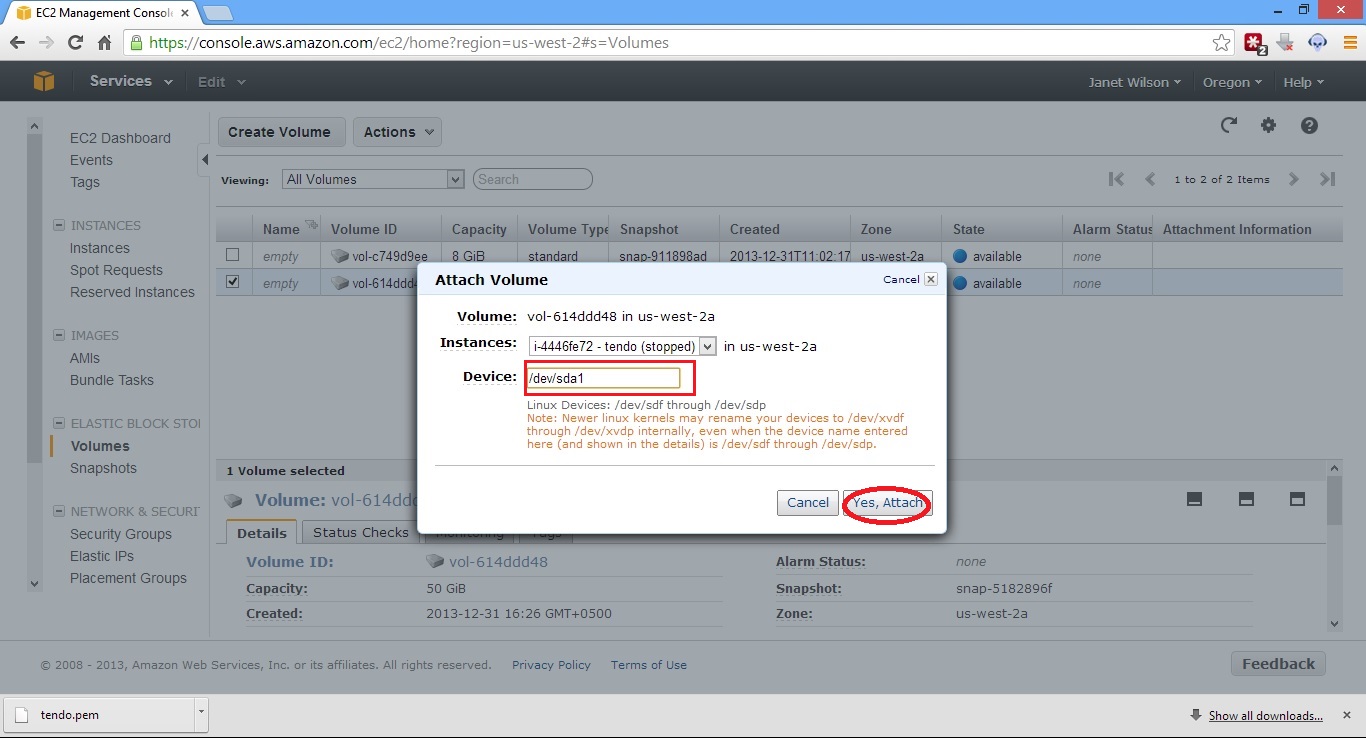
 Note: Make sure you also check the availability zone.